
Ergonomic Aids That Can Help the Pain
By Erik Nugent
Everyone’s hands are different. We all have different length fingers, thumbs, span of the reach from thumb to pinky, width of fingers and palms, and thickness of wrists. Flute makers have a hard enough time trying to design a flute that is ergonomically comfortable for most players with normal hands. When a hand has an injury, now these differences are compounded.
No two hand injuries are exactly alike.
I have had customers spend a lifetime loving the flute with normal hand position only to have arthritis literally change the shape of their hand. Some people were in an accident and can’t move their fingers like they used to. Often, they deal with the pain until they can’t any more, and then worry that they have to give up playing the flute. [Sometimes their fingers just won’t stay covered over the open holes, or they slide off of the keys and bump the trill levers, opening them up and killing their sound.]
While some injuries are too much for even the most creative solutions, for most players dealing with a hand injury, there are plenty of options to explore. In this article, I will explain some of the ideas that I have come across, beginning with less expensive, off-the-shelf options, and moving on to more expensive custom work.
It is my hope that this article will be read, not just by flutists who are facing pain, but by other flute technicians who might use some of these ideas to help their clients keep playing. If any flute technicians have questions about these ideas feel free to reach out to Erik at fluteworks@gmail.com.
All prices mentioned are retail prices current to when I wrote the article in early 2024, they are subject to change.
First Step: Fix the Flute
If your flute needs repair, I suggest you take it to a technician who specializes in handmade flute repair. Many times, I have had a customer complain about hand pain, and they had never had a Clean, Oil, and Adjust (COA). Most flute makers recommend yearly COAs to keep the flute playing great. Over time, small leaks crop up in the mechanism, and the player starts to squeeze the keys to try to get it to play. It is un-conscious but can create very bad technique.
For instance: if the Low C# doesn’t close all the way with the Low C key, the player has to contort their hand to close the C#, C, and B keys at the same time. This creates tension in the hand that they carry back to the rest of the flute when they come back up to higher notes. Having the low C and low C# adjusted correctly means you can have a rounded pinky and only touch the low C and low B rollers to make the low B come out.
Sometimes simply getting rid of leaks so that you can concentrate on relaxing your hand pressure will relieve pain.
Second Step: Correcting your hand technique when possible
The first things to try are the easiest ones. Hopefully the early stages of pain may just be poor hand position. Playing facing a mirror and paying attention to what your fingers are doing is the best thing that you can do to understand what is happening to your hands. What is the shape of your hand when the pain starts? Are your fingers slipping off and hitting the Trill levers?
Taking a lesson with an accomplished flutist, even if you are an accomplished flutist yourself, will bring a fresh set of eyes to what you are doing and how you might be able to work around the issue. Once you are armed with that knowledge it will inform the ideas in this article of what might and might not help you.
In the case of serious injury, you should consult with your doctor and a physical therapist or occupational therapist. Flute Technicians can try to bring the flute to you, but we don’t know about the medical aspects involved. In one case, I participated in a meeting with my client and their teacher in my studio while the client’s surgeon was on Zoom so we could all get on the same page.
Third Step: Inexpensive Accessories
The accessories below are relatively inexpensive and easy to put on and take off of your flute without the help of a technician. If someone comes into my shop, they can try many of these before they buy to see if this could be a solution for them.

Plugs Playing open hole flute can be very difficult for someone dealing with an injury. The easiest thing to do to the flute is put plugs in the problem holes of an open hole flute. It could affect tuning and tone just a little bit, but it is a very small price to pay. A player with a good ear will be able to compensate for any tuning differences, and after a while it will become second nature. If you have lost your set of plugs, don’t worry, plugs are cheap. If someone has any work done in my shop and needs a set of plugs, I just give them away. You can put plugs in just one or two holes, or place them in all the holes, whatever you need. I would recommend that when you find the right combination of plugged and un-plugged holes, you try to leave it that way so that the tuning becomes second nature.
Flute Gels These are a squishy rubber that has an adhesive on one side. You stick it to the flute where either your left finger or right thumb touch the flute body and create a comfortable place. The glue on the sticker can’t be re-positioned and when you take your flute in for a Clean, Oil, and Adjust it will have to be removed, so people who really like them end up replacing them regularly. A pack of 2 is $19.95.
Thumb Supports There are several thumb supports on the market for the right hand thumb. These help in 3 ways: 1) they remind us where the proper placement of our thumb should be on the flute. 2) They provide a little bit of leverage if the flute is rotating in our hands towards the player. 3) If the player has an unusually short thumb, they can still hold the flute with the correct hand position and not have the hand cramped into a tight ball. At the time of writing this article these range from $19.95 to $55, and include products like the Thumb Port, the Cobra Thumb Support, the Ton Kooiman Prima support, and the All-You-Can-3D finger rest.
Left Hand Supports These supports open up the left hand by placing material in between the flute and the side of the pointer finger. They include the Fingerport, Flute Gels, and BoPep. They cost $20-30.
Toe Spacers These are available from most pharmacies or online for under $10. They are intended to separate the toes from one another to help with things like bunions or overlapping toes that need to be corrected after years of cramming feet into uncomfortable shoes. If your fingers are coming together and you can’t separate them, placing one of these between your fingers can help to spread them out. Also, placing one on the left hand first finger and rotating it towards the open palm can create a soft shelf for the flute to sit on if you are having trouble with your left hand grip. These are inexpensive enough that you can use a razor blade to cut away material to shape it just right for you if needed, and if you mess up the first one doing it, it won’t break the bank to do it with another one.

Forth Step: Customization
If you have tried the low hanging fruit above and it either didn’t work, or worked for a while before your injury progressed, then you might try some of the following ideas. Part of my hope in writing this article is that it not only teaches players that there are more solutions out there, but also that sharing this might teach other flute technicians some approaches that they might use to help their clients. Customization can be done for some of these things through the mail, but having a great tech walking around looking at your fingers while you play will really help them understand what needs to be done.
Moving the trill keys. One of the most common things to happen to arthritis sufferers after using plugs is that their fingers can’t stay centered on the right-hand keys any more. As fingers slide around, they accidently bump into the trill key levers. When this happens an air leak is created way up at the top of the keys nearest to the headjoint, which just kills any other sound you might try to make on the flute. One solution for this is to lower the height or location of the trill levers.

Flute Crutch Flute Crutches are small “T” shaped stands that stick down from the flute body and rest on the webbing between the thumb and first finger of the left hand. This takes the pressure off of the side of the left finger. These were on many of Boehms first flutes and many early Boehm flutes made by Rudall Carte and others. They were held in place by a brace that was soldered onto a metal flute or screwed into place on a wooden flute. They went away when the vast majority of players just never used them. They could help a player who is having trouble holding the normal left hand position to hold the flute up. When I made the crutch that is pictured I started with a Finger Port and used a flexible epoxy to glue a piece of wood in place with a hole in it. Then I used the crutch from a Di Zhao Bass flute. This allows it to slide on and off without scratching so that you can remove it before putting the flute in the case. This cost about $112, all parts included.

Brannen Key Extensions These extensions are made by Brannen Brothers Flutemakers, but can be adapted to a flute by any good flute repair tecnician. If your finger can no longer reach the middle of a key, with these extensions we can easily remove a plug, and place the extension in the same hole that the plug goes in. There are different lengths and 2 different angles, so most repair people who use them will tend to stock several sizes so that they can figure out how to make it fit your hand.

This person was sliding off of the E key and hitting the D# Trill key, so here you see a combination of 1) a lowered D# Trill key 2) a Brannen key extension in the E key and 3) I raised the key extension up on a bed of black felt to make it just a little bit higher. (Note to repair techs: I have a set of 1-72 screws that are much longer than you would usually use in a pad washer and I brace the Brannen extension on the other side with a closed hole pad washer. It is easy for a tech to reverse in minutes.)

The D# trill in the first picture can still be played by the D finger of the player who thankfully had skinny fingers. Someone with thicker fingertips would have a hard time reaching the D# Trill lever wihtout hitting the E and D keys by accident. How much a tech can do to adapt the flute to you depends on many factors.
There are also Brannen key extensions for the C1 (first finger left hand) and the G# (Not pictured).

Key Edge Wall Another way to deal with fingers sliding off of a cup is to make a little sterling silver wall. This would normally be played with a plug in. The players D finger was slipping off and hitting the D# Trill. This silver wall was soldered onto the key using a low temp solder. The keys of this flute are solid silver, so if anone wants to remove this wall it can be removed and the solder cleaned up and the key re-polished for under an hours work by a repair tech well versed in soldering techniques. If done well you would never know it was there. I have glued in a cork wall for players so that they can figure out without big expense if it would work or not in a temporary manor. Once the decision was made as to if it helped or not, we soldered in the final wall. Approximate cost: $200-$300.
Weight removal Another thing that can help many players, especially those with elbow or shoulder issues, is removing the weight of the flute from the hands. There are a few devices out there that can help. In this picture is an inexpensive device that I make called the Anti-Gravity Stand. It can be made by anyone who knows how to drill and tap a hole in steel. The bottom part is a microphone stand and the top part is a yoke from a guitar wall mount. By making this with inexpensive off-the-shelf parts, I can do it for $50-$70. This stand is fairly static. If you are an expressive player, you can’t move around with this stand.

The Bass Boost is another wonderful flute support that is more flexible. It can fold up smaller than a microphone stand, is much lighter, and the player can move around as they play much more. It comes highly recommended. It is also much more expensive at $350, but will probably be worth the extra cost for many players.
Extreme Customizations

I custom made these extensions for a customer determined to play as long as she could in the face of severe arthritis. This was after trying all of the above ideas (some of the earlier pictures are from her flutes as well). By this point she had recovered from several surgeries. Her thumb was preventing her from rotating her hand forward and some of her left hand finger joints were frozen. Her range of motion was very limited, and this was the only way that I could bring the keys to her hand. The color of the metal doesn’t match because I chose to use Aluminum as I needed the lightest material that could take on this kind of length. The A and G keys are held in place with screws through regular closed hole washers placed over the normally open holes. These extensions can swing around to move to different places if needed. The G# and C1 keys are both glued in place with contact cement, a glue used all over the musical instrument repair and manufacturing industry, and can be removed easily by a qualified repair person. This entire modification could probably be reversed in 30 minutes to an hour, and you would never know it had been there. The biggest drawback to this kind of customization is that it won’t fit in a traditional case without the extensions hitting the headjoint. She already had a flute/piccolo double case that was able to be customized to fit these extensions without the piccolo in it.
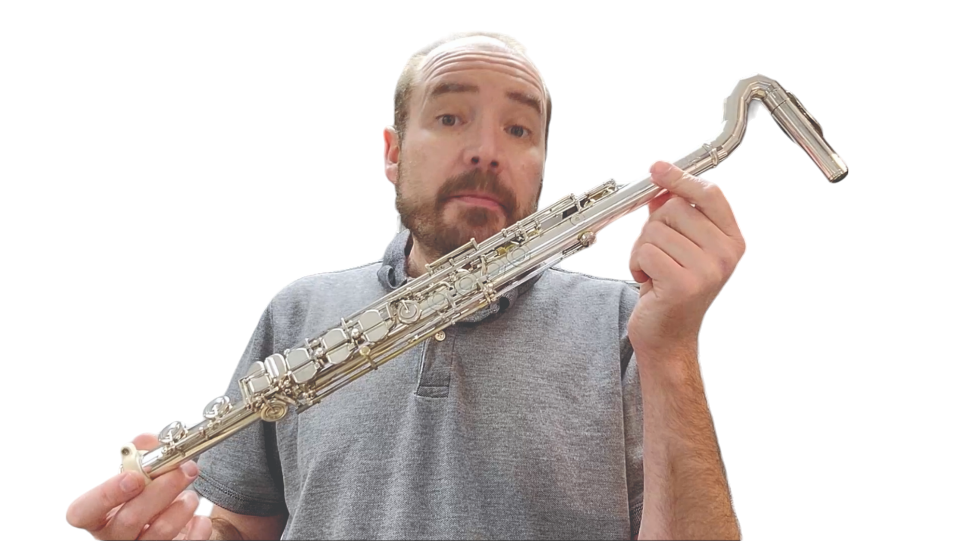
The One-Handed Flute This incredible instrument was origionaly a beautiful Powell drawn tonehole flute, but it was adapted for a player with the use of only their right hand by Maarten Visser of Flute Labs in Amsterdam.
Obviously this is a very time consuming project by a highly skilled craftsperson. Maarten removed the left hand toneholes and put patches where they had been. He then placed toneholes on the back side of the flute in the exact same distance from the embouchure hole. This allowed him to spring these toneholes shut instead of open, making the fingering system possible. I was lucky enough to have it in my shop for a few normal repairs and COAs.
Watch my demostration of this unique instrument below:
A brief summary of the video is that D to F# are fingered the exact same way you would on a Boehm flute. G is all fingers open so that you can transition to the next half octave where you shift your fingers over to the second set of levers. In the video, please forgive me, I did a COA and the owner came to pick it up the next day. With only an hour or so to play on it my technique with a new fingering system was somewhat lacking! The owner sounds beautiful on it. She was a professional flutist before her stroke that took away the use of her left hand.
If you are facing injury, I hope that some of the ideas in this article will give you hope, reduce pain, and bring back joy to your playing. Please feel free to share this article with any local repair people who might be able to help you find the right adaptations for you.
Erik Nugent
www.fwseattle.com | Facebook Page
I grew up in Chapel Hill, North Carolina in a family of creative thinkers including Visual Artists, Doctors, Musicians and Dancers. I started playing music at age 10 and never looked back.
In 1996 I received my Bachelors degree in Music Education from the University of North Carolina at Greensboro. In 1999 I moved to Boston to begin making handmade flutes as a finisher for Verne Q. Powell and later for David Williams. I became the Repair Manager for William S. Haynes and then the Quality Control Manager for Nagahara Flutes for 9 years. In 2016 a desire to be my own boss and live near family brought me to Arkansas where I opened up Nugent Flutes.
In 2019 I purchased FluteWorks Seattle from Courtney Westcott and moved up to the Seattle Area. I have grown FluteWorks Seattle to the point where I now have 2 full time employees and the largest selection of flutes for sale in the Pacific Northwest.

✨ Explore Flute Craftsmanship & Design
Flute engraving represents one of the many ways instrument makers combine artistry and craftsmanship. Discover flute makers, custom builders, repair technicians, and specialists whose work contributes to the beauty and performance of today’s instruments.
The Global Flute Directory is a growing international resource connecting flutists with makers, repair specialists, educators, organizations, and professional resources from around the world.


Excellent article with very good and hopeful information. Congratulations on your professional success and for helping flutists to keep on playing under adverse conditions!