

By Lindsey McChord
As a professional hand engraver and flute repair specialist, my customers often ask me about engraving their flute. They want to know where engravings can be added and what areas may be off limits. They want to know how the flute is engraved; what tools and methods are used, and what the process looks like. More than anything, my customers want to know what impact the engraving will have on how their flute feels and how it sounds.

Before we can answer these questions we have to understand that not every flute is be suitable for engraving. Different manufacturers produce flutes in their own way, and this can interfere with engraving sometimes. For example, plated metals are not typically suitable for engraving because the metal will flake away revealing the base metal underneath. Thinner tubed flutes are more fragile and can’t handle heavier engraving. It’s always a good idea to consider these things and go over them with your engraver before planning a project. With these considerations in mind, let’s explore!
Where can I have engraving on my flute?
Lip Plate

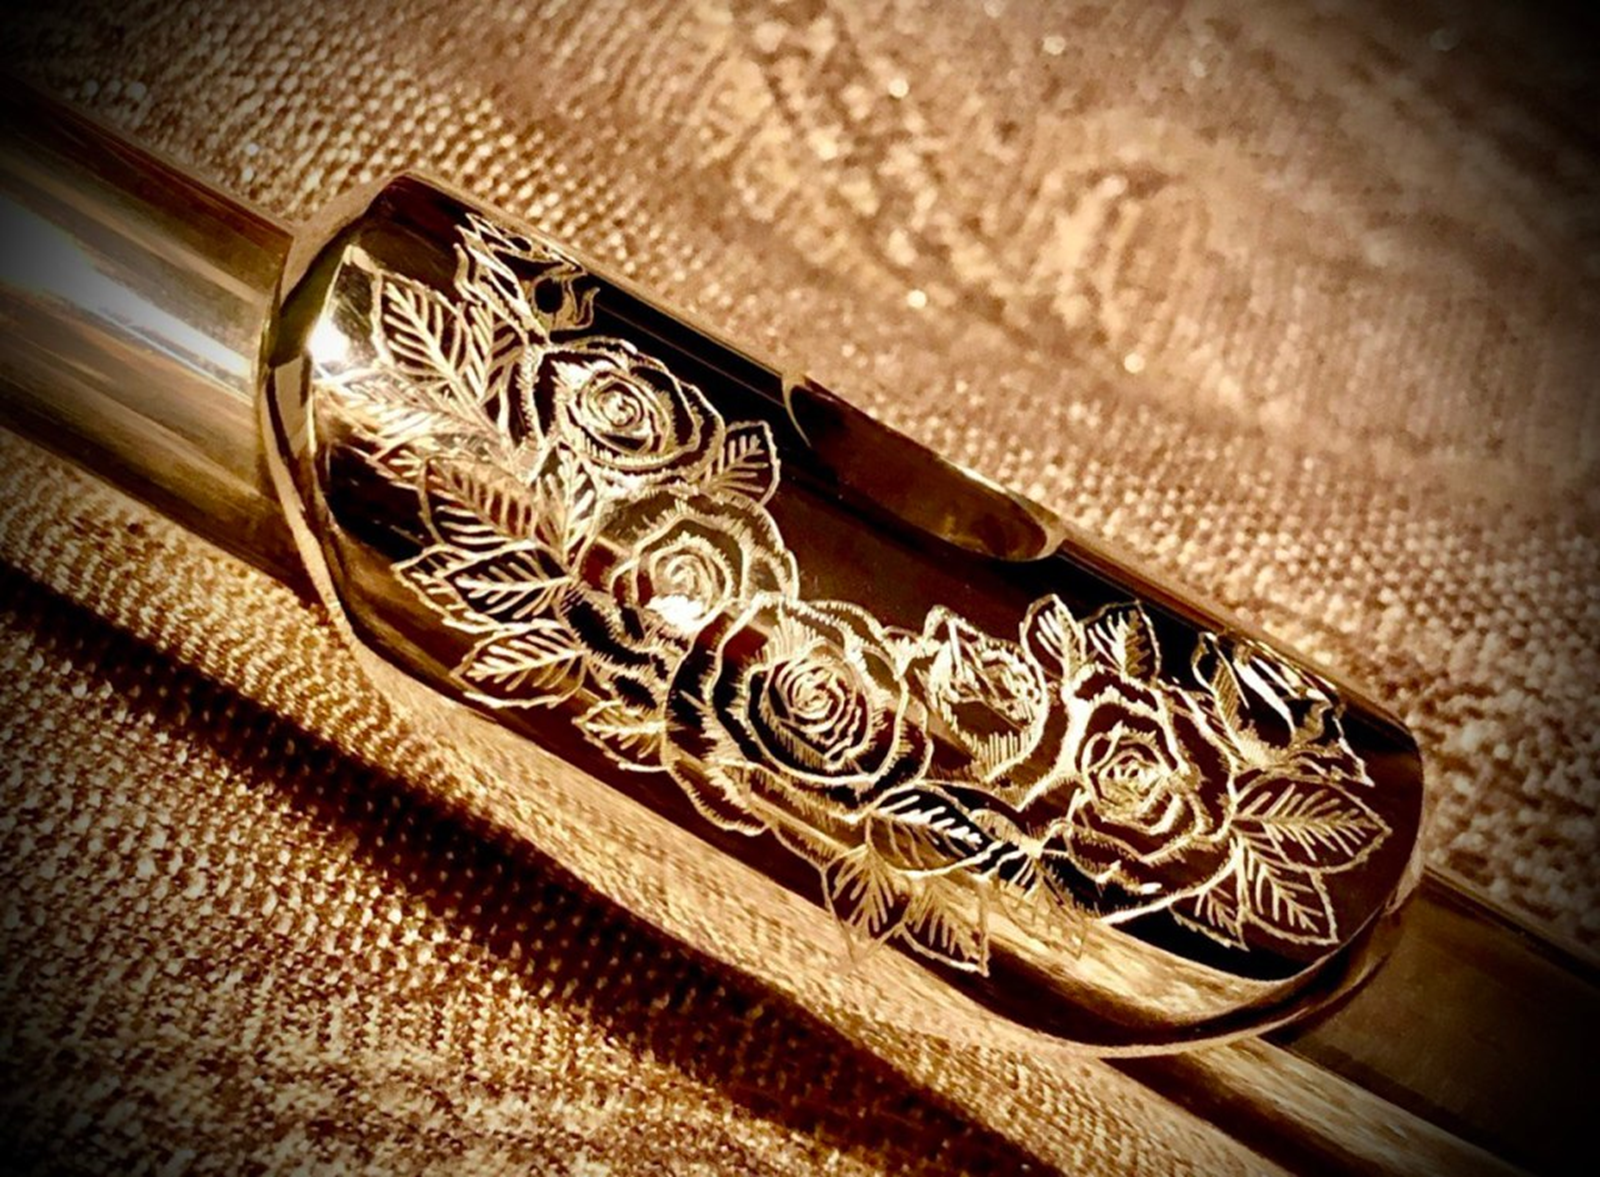
Lip plate engravings are one of the most sought after engraving locations. There are two versions – light engraving on the surface or slightly deeper engraving. The light engraving is very pretty and the lip plate still feels quite smooth, while deeper engraving works well for those that need a little more grip and want the lip plate to settle on the chin more securely. Engraving can be done on the back of the lip plate where the chin rests and on the side bevels.
Engraving can’t be too close to the embouchure hole, overcuts, or near the front of the lip plate because engraving in these areas will interfere with how the air moves across those areas, adversely affecting how the headjoint sounds and responds.
Keys

Keyengravings are another popular choice for many flutists. The engravings add texture for a better grip and they look stunning! Both open and closed hole keys can be engraved, all key sizes can be engraved as well. Cup skirts can be engraved but care should be taken as anything beyond a light engraving can affect how the pad fits into the key cup. Engravings on areas with adjustments, such as back connectors or tails, aren’t recommended due to how fragile these areas can be.
Depending on the manufacturer, certain key styles are more suitable for certain designs than others. Keys with Y arms and keys with pointed arms or open holed keys and closed hole keys each have differences that will alter what kind of engraving will work best. Most engraving designs can be altered slightly to be suitable for any key style.
Crown

Crown engraving is a popular way to add a little pizazz to the flute without making a permanent change, as crowns can be swapped out. Flute manufacturers have all kinds of crown options with all kinds of contours and different shapes, so just like with the keys, the shape of the crown should be taken into consideration when choosing a design.
Rings

Rings are not an area usually recommend for engraving on a finished flute. The process of engraving rings on a finished flute is time consuming and expensive due to the amount of work involved. For this, the barrel and rings have to be unsoldered and removed before the engraving process can begin. Once the engraving is completed, any remaining old solder has to be removed, the parts have to be cleaned and polished thoroughly and then soldered back onto the flute. Ring engraving is best accomplished while the flute is being built at the factory.
The manufacturer can send the rings to an engraver to custom engrave off-site and they can be added to the flute when it is time to do so in the production process.
Open Ares of Tubing

Open tubing engraving is possible but caution should be used because depending on the location, it can change the sound. Open tubing refers to the areas with uninterrupted space away from the lip plate, the tone holes or under the mechanism. It is not a good idea to engrave on the open tubing on the headjoint because it has the potential to change the taper of the tubing which will alter the sound.
Engraving can be added around the end of the footjoint near the ring, up by the barrel or on the barrel itself. These are all areas that are generally engraved by the manufacturer with a logo or other design, so there is never an issue with engravings there.
What does the engraving process look like and how does the engraving change the sound?
Lip Plate


To engrave the lip plate, first the lip plate should be carefully inspected for signs of wear from prior sanding and polishing by the manufacturer or subsequent repair technicians. The customer should let the engraver know if their lip plate has suffered any trauma in the past (dent removal and scratch removal processes can thin the material).
Once the lip plate is proven to be solid (not plated) and thick enough for engraving, the cork and crown are removed, the tube is taped up, and the arbor is placed inside the tube for support and to limit vibration during engraving.
The design for engraving is carefully drawn onto the lip plate either using pencil or transferred from a printer. To transfer, the lip plate is coated in a chalk like solution that dries tacky and white; the desired engraving design is printed onto transfer paper and then pressed onto the lip plate. Gently burnishing the transfer paper over the lines of printed ink will leave a perfect image of the printed ink design.


Once the engraving design is transferred onto the lip plate, the tube is secured in a holding device to keep it from being distorted during engraving. Some engravers use a moldable wax that is melted and shaped around the headjoint. As the wax cools it is placed in the vise and allowed to harden around the headjoint, holding it securely. The vise is padded with leather or foam for added turbulence absorption and also to protect the tube so that it can hold it securely without marring or distorting it.
Any vibration should be eliminated if possible to ensure the resulting engraving is smooth and clean. Using great care, the engraver then cuts over the lines of the design using either a hand push method (holding the graver and carefully hammering it along the transfer lines) or an air graver powered by a foot or palm control device. Both methods produce beautifully ornate engravings.
Lip plate engraving can change the sound in subtle ways. If you find the headjoint slipping around on your chin, adding an engraving may help to avoid sound issues due to inaccurate or varied placement on the chin. Engraving on the lip plate will change the sound if it is too close to the embouchure hole, too close to the overcuts or if it crosses in front of airstream on the front of the lip plate. Engravings that pass beyond the back of the lip plate can change how the air flows and will in turn change how the headjoint feels to play.
Keys

To engrave flute keys, it is usually recommended that the player schedule their engraving for when their flute is due for an overhaul. Since I run a busy repair shop I schedule both services at the same time. The pads, all felts, foams, and corks are removed and the mechanism is unpinned and taken completely apart. Keys are thoroughly cleaned, polished and the mechanism tubing is taped up to avoid scratches.
There are several methods for holding the key while engraving; the main goal is to hold it securely while supporting the inside of the key so that it doesn’t get distorted during the engraving process. The melted holding wax works well when pressed into and around the key to support the interior as well as any arms or back connectors. Once hardened, it absorbs vibration, stabilizes the key in the vise and supports the interior of the key during engraving. Once the key is solidly protected in the hardened wax, the design is drawn on or transferred and carefully engraved.
Once the engraving is completed the keys will need to be leveled and adjustment space reset since the shape of the keys can change slightly through the engraving process. Key heights, pad protrusion and all other mechanics are calibrated back to the manufacturer standards, ensuring that the flute will play just as beautifully as it did when it was first made. Keyengraving doesn’t change how the flute sounds, but since key engraving should be done during an overhaul the sound will change somewhat initially.
Crown

Engraving on the crown is nearly identical to lip plate and key engraving. The crown is thoroughly polished and cleaned, tape is applied to areas not to be engraved and the desired design is drawn or transferred in place. Holding wax or a pitch bowl can be used to securely hold the crown for engraving. Working on a round surface like a crown has its challenges as tight curves, rounded edges and steep drop offs can cause the graver to cut away into unintended areas and scratch the surface, so great care has to be taken here.
Crown engraving shouldn’t have much effect on how the flute sounds. A shallow or thin engraving on the crown doesn’t remove much material so the sound shouldn’t change if a simple design is added. That said however, a deeper engraving can potentially change the weight of the crown which can change the overall balance and response of the flute.
Rings

Although it’s not recommended to add engraving to rings on a finished flute, rings for a new flute can be engraved prior to being installed on the flute. The biggest challenge to ring engraving is how to hold it securely while also being able to engrave all the way around the surface. Instead of using a holding wax or pitch bowl, the ring can be held in a ring holder specially designed for engraving.
This allows the ring to be held securely, supported fully, and with access all the way around the area to be engraved. In the example picture above, the ring is held in a holding wax to work out the placement of a design before being moved to the ring holder.
Open Tubing

Engraving on the open tubing is completed similarly to engraving the lip plate in that the metal is polished and cleaned, areas not to be engraved are taped off, and an arbor is placed inside the tube for support. The pattern or design is then drawn in place or transferred on. The tube is held carefully in the padded vise to keep it secure, as well as scratch and vibration free during engraving.
Extreme caution should be taken to ensure that the tubing is thick enough and the engraving is on the shallow side. Bright cuts and deep relief engravings can cause already thin tubing to be even thinner and can reveal any imperfection within the tubing introducing tiny leaks.
Generally, engraving on the open tubing won’t change the sound. Small amounts of engraving (initials, a small logo) are fine but a large scale engraving (covering the entire headjoint tube for example) can alter the taper of the tube and change the sound of the headjoint. If these larger scale engravings are attempted, care should be taken to not cut too deeply and the tubing should be supported with an arbor at all times to limit the possibility of distortions.
It’s a good idea to take the time to play on a flute that has engraving on it in the areas you’re planning to have engraved on your flute. This way, you can get an idea of how it will feel and you can adjust your plans accordingly. This is especially true for lip plate and key engravings where there is constant contact. Perhaps the most important thing to keep in mind when you’ve decided to have your flute engraved is to work with an engraver that has experience working on flutes. This way you can be confident that your flute will be taken care of properly throughout the process and you’ll get your flute back looking and playing beautifully.
Lindsey McChord
Website | Instagram | Facebook
Lindsey McChord is a headjoint maker, hand engraver and flute repair specialist based in Waterville, Maine, where she works with flutists across the USA and worldwide. She holds a Bachelor of Music in Flute Performance from the University of New Hampshire, where she graduated cum laude with honors. She holds a Master of Music from the Longy School of Music, where she graduated with Distinction. Her primary teachers include Robert Willoughby, Peggy Vagts and Julie Scolnik.
Having always been interested in flute making, she took the position of headjoint maker and flute finisher at Verne Q. Powell Flutes in 2011. While there she quickly earned her place as one of the finest headjoint makers in the industry. She is credited with several original headjoint designs and personally hand cut most of the headjoints made at Powell during her 10 year tenure there.
In tandem with headjoint making she also excelled as a flute finisher and repair specialist at Powell, finishing hundreds of flutes for highly satisfied customers all over the world. Her creativity, attention to detail, exacting standards, and high level of accuracy make her an exceptionally talented headjoint maker and flute repair specialist. Above all, her high level of playing skill allows her to excel in designing and cutting headjoints as well as setting up every flute she repairs to the highest possible standard.
In 2019 she began learning the art of hand engraving, traveling to Louisiana to work closely with master engraver Sam Alfano and consulting with master flute engraver Brian Powley on her flute related engraving. Proving herself to be uniquely talented at engraving, she quickly began offering custom engraving services and once she became truly proficient she decided to form her own company where she could fully explore her own design ideas.
In 2020, she founded her company McChord Flutes, where she designs and makes custom headjoints, engraves ornate designs on flutes and jewelry and offers professional flute repair to clients throughout the USA and worldwide.


Quando il flauto diventa anche un oggetto d’arte!
Grazie, Lindsey, per questo tuo contributo!
Thank you so much!
I love this article, thank you, Lindsey!
I really appreciate very clear explanations of the engraving process, which I was always curious about and all the visual examples of your stunningly beautiful work! You such an Artist! I am fascinated! Bravo!
Thank you so much Yulia! I’m so glad you enjoyed reading and thank you for your kind words about my work!
Excelente artículo! Gracias por tu clara explicación y consejos acertados.
Wonderful article, thank you!